How to Do Blonde Highlights at Home [Step By Step Instructions With No Foil or Cap]
This post may contain affiliate links, which means I may earn a commission if you decide to make a purchase through our links, at no cost to you. You may view the disclosure here.

DIY Hair Highlights At Home
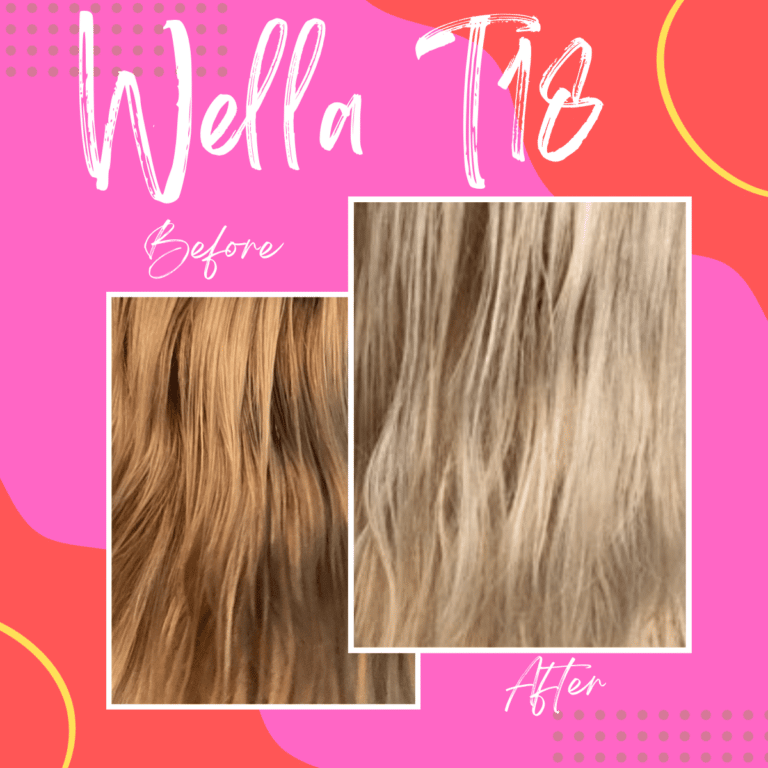
I bleached my hair 100% blonde last summer with Wella T18 toner and loved it. It was a fun change! Then, I went darker in the winter and returned to my natural hair color. Recently I’ve been craving blonde highlights, so I decided to add highlights to my hair at home. I don’t have much patience, so I highlighted my hair at home with no foil, no kit, and no cap.
Want to know how to highlight hair at home without a cap and without foil? Continue reading to learn how to do highlights at home (I’m all about DIY!) in six simple steps.
This guide on how to highlight hair at home includes:
- Step by step instructions on how to highlight hair at home
- How to get blonde highlights at home with no foil
I’ve also included before and after pictures of my at-home highlights and a summary of the products you’ll need to buy to highlight your hair at home.
How to Highlight Hair at Home: 7 Steps to Get Blonde Highlights at Home
Want to learn how to highlight hair at home? Follow these step by step instructions to get blonde highlights at home.
1. Buy the Right Products to Highlight Your Hair at Home
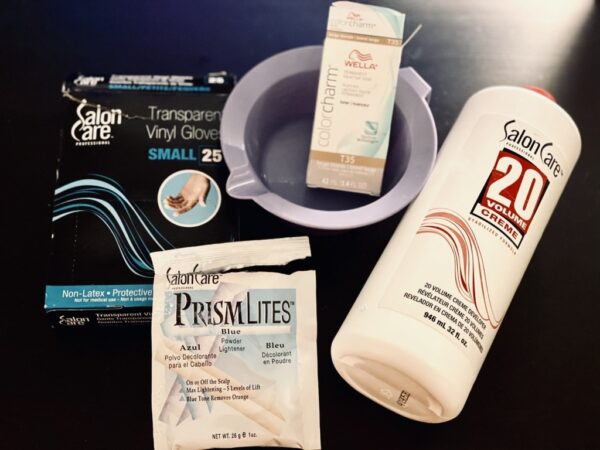
Before you start the process of highlighting your hair at home, you need to buy right products.
Below are the products you’ll need to highlight your hair at home. You can buy these DIY highlight products from Sally’s Beauty or Amazon.
PS – I don’t use foil or a cap for highlighting my hair at home. (It’s too much work!) I don’t use a hair dye kit either.
Essential Products for DIY Blonde Highlights at Home
1. 20 Volume Developer: SalonCare 20 Volume Developer
2. Wella Toner: I used the T35 for my highlights this time around
3. Gloves: SalonCare gloves or similar non-latex gloves
4. Bleach: PrismLites Blue Powder
5. Mixing bowl: Purple hair color mixing bowl
2. Do a Test Prior to Bleaching or Dying Your Hair
You should do a test prior to bleaching or dying your hair blonde. Cut off a strand of hair from the back of your head and do a test. I did a test the very first time I bleached my hair, and now I just go ahead and dye it.
3. Bleach Your Hair
If you are going lighter you need to bleach your hair first. For highlights only (versus dying all of your hair blonde), you can use half a pack of PrismLites blue powder.
Instructions for Bleaching Your Hair at Home
1) Mix 1 scoop of the Prism lights Blue powder with two scoops of the SalonCare 20 volume developer in a mixing bowl.
2) Put on your gloves.
3) Dip your gloves into the bleach mix and apply to the front of your hair.
Below is a 9-minute video showing my hair before adding the highlights and demonstrating how to bleach your hair. The best thing of all? I didn’t use foil or a cap to do the highlights!
4. Wait 30 Minutes and Rinse Out With Shampoo
After you’ve added the bleach, pull your hair up into a ponytail and wait for the bleach to set in.
When I bleached all of my hair blonde, I put on a plastic shower cap over my head to allow the back part of my hair to “catch up” with the front part of my hair that I bleached first.
With my at-home highlights, I only highlight the hair around my face, so no shower cap is needed.
I leave the bleach on my hair for 30 minutes and then rinse it out in the shower with a simple shampoo.
As you wait 30 minutes for the bleach to work its magic, you will notice that the bleach will turn purple or green in your hair. This is normal! Here’s a quick video showing what my hair looks like after letting the bleach set in for 30 minutes.
What Hair Looks Like After Applying Bleach
After adding bleach to hair and waiting 30 min
What Hair Looks Like After Rinsing Out Bleach
Your hair will likely be bright yellow like a banana after rinsing out the bleach in the shower. Don’t worry! This is normal and expected. The toner (in step #5) will fix this.
5. Apply Toner to Get Blonde Highlights at Home
The next step is to add toner, which is the step in which you add back in the color.
I used the Wella T35 to highlight my hair this time around. If you want an ash-white color I’d recommend T18. I’ve also used Wella 27 toner in the past and have had great results.
To learn more about toner colors and to choose a toner for you, check out this Wella toner guide on T18 vs T27.
1) Similar to the bleaching process, mix 1 part Wella toner with 2 parts 20 volume developer. To highlight my hair, I only used half a bottle of the Wella toner.
2) After you’ve mixed the toner and developer in the mixing bowl, apply the toner to your entire head – focusing on the areas that you bleached.
Check out the Very Easy Makeup YouTube video (and please subscribe!) to see step-by-step instructions for mixing toner with developer and to learn how to apply toner to make your hair blonde.
6. Wait 20 Minutes and Rinse Out With Conditioner
The next step is to wait 20 minutes for the toner to work its magic.
If desired, you can wait up to 30 minutes, but I’ve always found that 20 minutes is sufficient.
In the shower, I rinse out the toner with warm water and a simple conditioner. If you have a deep conditioner now is the time to use it. If not, no worries. I didn’t use a deep conditioning treatment this time around.
7. Go Easy On Your Hair After Getting Blonde Highlights at Home
After you’ve rinsed out the toner and moisturized your hair with conditioner you are done! I highly recommend letting your hair dry without a hair dryer. You need to go easy on your hair for the next two days. Don’t wash it and avoid the pool for two days.
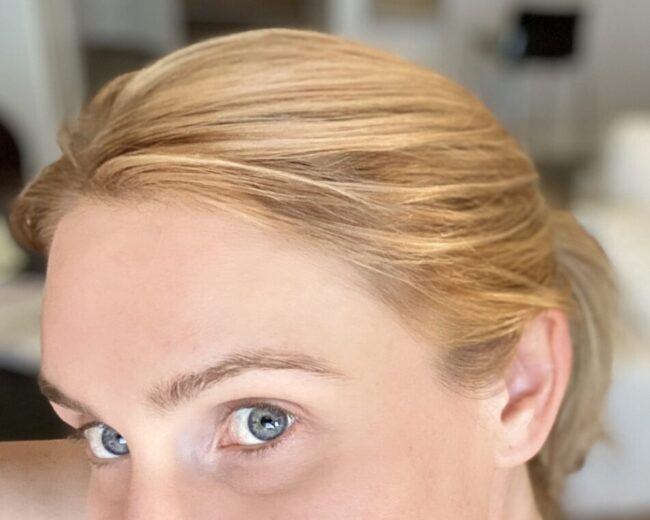
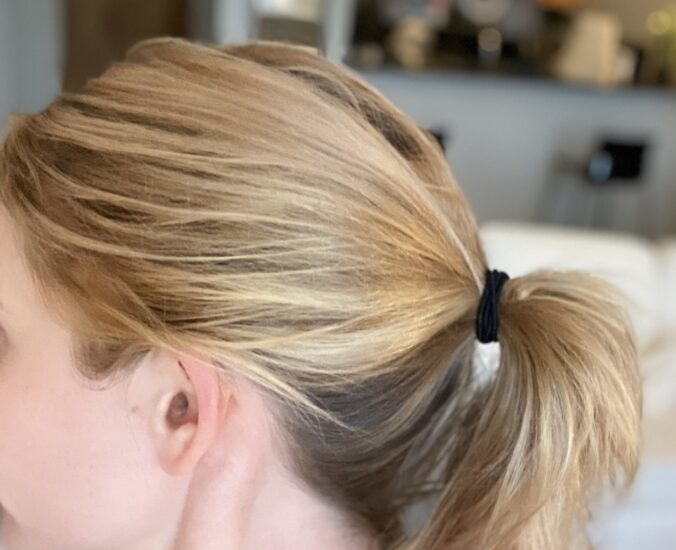
Before and After Picture of At-Home Blonde Highlights
Curious to see the result after following these steps on how to highlight hair at home?
Check out the before and after pictures to see my shining, highlighted hair after highlighting my hair at home (and only in 1-hour!).
Before Picture of At-Home DIY Highlights

After Pictures of Highlighting Hair At Home
Best Blonde Hair Products You Will Love
In the mood for a hair shopping spree?
Just for fun, below are the hair products I’m loving now.
- Curling Iron: The flat iron by BaBylissPRO
- Purple Shampoo: Oligo Blacklight Blue Shampoo
- Brass Toning Purple Conditioner: L’Oreal Ever Pure Sulfate Free Conditioner
- Detangling Brush: Wet Brush
- Styling Oil: Olaplex No. 7
- Conditioner Proven to Detangle: Aussie 3 Minute Miracle Mhttps://helloivoryrose.com/2019/03/01/diy-hair-highlights-at-homeoist Deep Conditioner
- Hair Mask: Amika (they changed their packaging recently)
Want to Go Darker Instead of Lighter?
If you want to go darker instead of lighter, check out the John Frieda color-deepening treatment. I’m a big fan.
Here’s a detailed review of the John Frieda Brilliant Brunette Visibly Deeper Colour Deepening Treatment. If you want to try it out, here’s a YouTube video from Very Easy Makeup showing you how to use it.
Leave a comment below if you have any questions! Or send me a message via the Very Easy Makeup Facebook page or on Instagram.
Happy highlighting!
Christina Marie